

Full Offset Brick Extension for Google Nest Doorbell (Battery / Wireless) | Custom Depth | Storm Door Clearance

Replacement Adapter Bracket for Doorbell Mounts (Select Your Model)
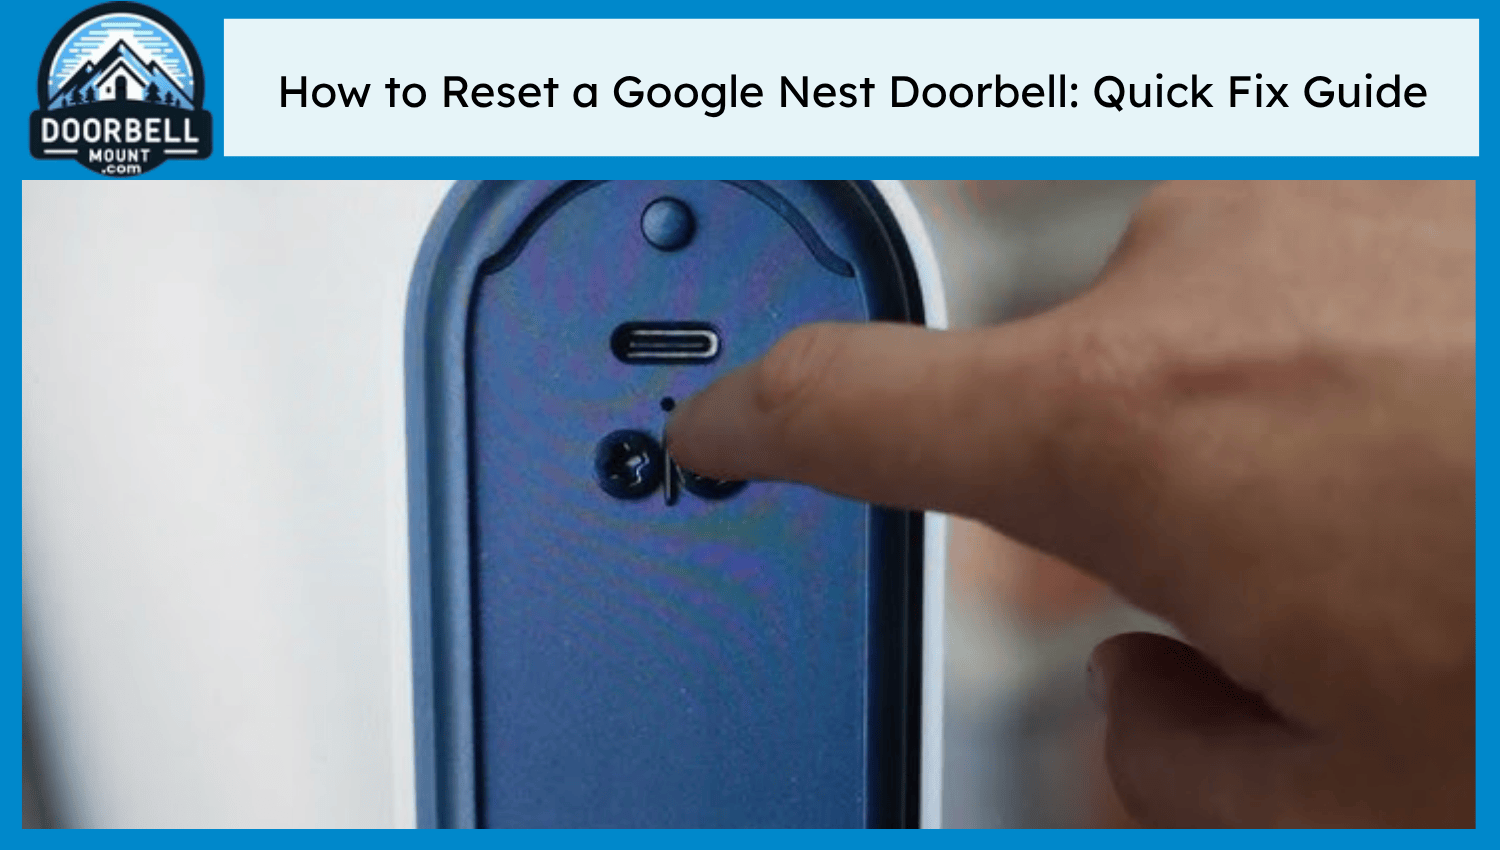
Resetting the Google Nest doorbell fixes bugs, connection errors, and lags in video recordings. Slide up and remove the battery doorbell from the wedge. Look at the pinhole at the back above the two screw terminals. Insert the reset pin for 5 seconds until the light turns solid white. Follow the same procedure to reset the wired doorbell. The wired doorbell is easy to reset with a round ring button on the front. Its yellow light blinks and then stays solid when ready to connect. Resetting the Google Nest doorbell deletes all the recorded event history, face detection library, and changes in settings. The device looks offline in the Google Home App. Restarting clears the cache and memory issues. Do not forget to charge the wireless doorbell before resetting it to provide power.
What to Know Before Resetting
Here are the four factors to consider before resetting the Nest doorbell:
- Backup Data: Google Nest doorbell reset permanently deletes all the captured images and videos. Make sure to download the events manually to the local storage before resetting the doorbell.
- Subscription Impact: Doorbell reset does not affect the subscription, though it impacts its features. The doorbell does not capture any familiar face detection, and event video recording options after reset until the previous Google account is linked. Cancel the subscription if changing accounts before resetting to avoid getting charged every month.
- App Access: Remove the Nest doorbell from the Google Home App and relink after resetting the device. Link the router and enter the accurate password to run it.
- Power Check: Check the power supply for both wired and wireless doorbells. Charge the battery models to make sure they reset easily without going offline. Keep the wired doorbells plugged in for a stable power supply.
🔄 Resetting Your Nest Doorbell? Make Sure It Goes Back Up Perfectly.
After a reset, your Nest doorbell may need repositioning for optimal performance. The right mount ensures proper angle, stable placement, and reliable motion detection — especially on brick, siding, or uneven surfaces.
How to Perform a Soft Reset (Quick Restart)
Here are the three tips to perform a soft reset on the Nest doorbell:
- Locate the Reset Button: Remove the Nest doorbell device from the wall and locate the pinhole at the back of the doorbell.
- Press and Hold: Hold the pin in the pinhole for 5 seconds for a quick restart. The white solid light shows that the device is ready to pair and connect with Wifi.
- Wait for Automatic Restart: The Nest doorbell automatically restarts when the light turns white, and the ring button also starts working with a chime.
🔄 Best Mount Setups After Resetting Your Nest Doorbell
Once your Nest doorbell is reset and reconnected, proper placement is key to restoring full performance. Use the right mounting solution below for optimal results:
| Installation Type | Post-Reset Benefit | Link |
|---|---|---|
| Front Door Straight Mount | Ensures accurate motion detection after reset | View Fixed Mounts → |
| Adjustable Angle Mount | Fine-tunes camera angle after reinstalling device | Browse Adjustable Mounts → |
| Corner / Side Wall Install | Improves field of view for better coverage | Shop Corner Mounts → |
| Brick or Uneven Surface Setup | Provides stable mounting after device reset or reinstallation | View Brick Extension Mounts → |
| Vinyl Siding (No-Drill Install) | Allows quick repositioning without damage | Shop Vinyl Siding Mounts → |
💬 Need help reinstalling your Nest doorbell? Send us a photo: 833-326-6868
How to Perform a Factory Reset
Here are the three tips to perform a factory reset:
- Detach the Doorbell (If Needed): Detach the battery and wired doorbell to locate the pinhole at the back. Make sure the wireless doorbell is charged above 50% and the wired doorbell is also getting a power supply.
- Press and Hold: Press and hold the pin for 12 seconds until the yellow light starts to blink four times in wired doorbells.
- Wait for Reboot and Reset Completion: Wait for 5 seconds once the white light in the battery and the yellow light in the wired doorbells appear. The doorbell automatically deletes all the stored data and restarts.
What are the Troubleshooting Reset Problems
Here are the four troubleshooting reset problems with Nest doorbells:
- Reset Button Not Responding: Make sure the doorbell is charged or plugged into the outlet to supply power if the button does not respond.
- Light Not Flashing: Make sure to hold the side power button and pin in the pinhole for wired doorbells to reset it. Maintain the power supply if the light still does not flash.
- Device Not Reconnecting: Make sure to remove the device from the Google Home App after resetting the doorbell and reconnect later. Check wifi connection and stay near 0 to 15 feet of the router. Give necessary permissions for location and Bluetooth to the doorbell to avoid connection errors.
- App Sync Error: Clear cache if the app does not link after reset. Uninstall or try connecting on any other device.