


One Adjustable Mount That Fits Every Major Doorbell (0-35°)
Custom Bracket for Your Doorbell – Please Select Your Model!
This single adjustable base works with 100+ video doorbell models — just pick yours from the dropdown to receive a perfectly matched adapter bracket.
- CRITICAL: Choose your exact Doorbell Model and Brand from the dropdown menu. This ensures we send the correct, tailored mounting plate.
- Our system supports a wide range of popular video doorbells, including many Ring, Nest, Eufy, Wyze, Blink, and Reolink models.
- Not Sure About Your Model? Doorbell names can be tricky! Text, email, or message us a photo of your doorbell before placing your order. (Contact details below).
- Your Model Isn't Listed? We love custom work! Reach out with your doorbell's details, and we'll do our best to accommodate it.
Need help figuring out which Ring doorbell you have? Consult our Ring Model Identification Guide.
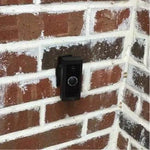
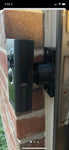
Optimize Your Camera's Field of View (0-35° Adjustment)
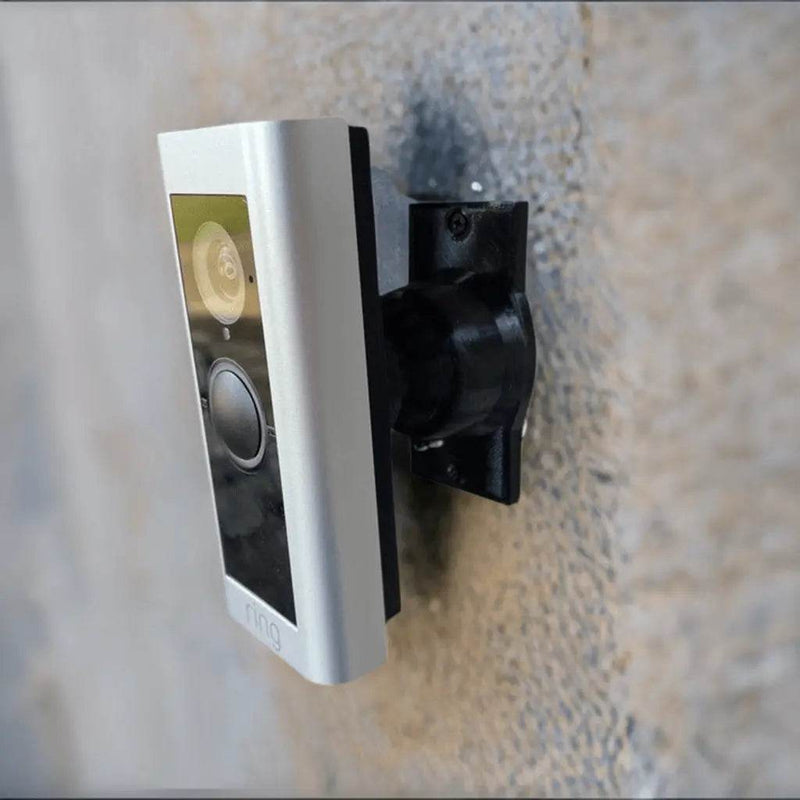
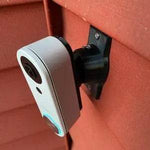
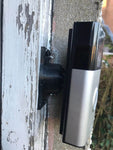
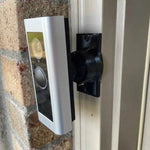
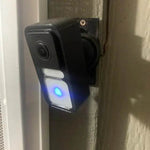
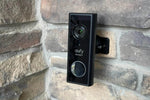
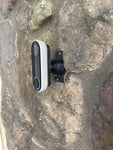
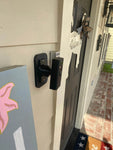
Seeking that ideal camera angle from your video doorbell? This compact swivel mount delivers precise aiming with an adjustable range of 0 to 35 degrees. The adaptable dual-axis joint allows you to micro-adjust the view both horizontally (pan left/right) and vertically (tilt up/down).
It's the perfect solution when your doorbell is mounted near your entryway on the same wall surface but requires a subtle directional change, or needs a slight angle correction on uneven or angled siding. Its low-profile design maintains a sleek look, sitting closer to the wall than bulkier angle mounts.
Dual-Axis Swivel: Precision Aiming from 0-35 Degrees
Achieve precise control over your doorbell camera's perspective. The smooth articulating joint allows for meticulous adjustments across a 0° to 35° arc relative to your mounting surface, ensuring you capture the exact area of interest.
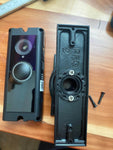
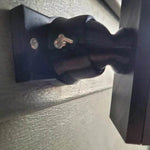
Adaptable Base Installation: The wall base plate can be mounted vertically or horizontally to best suit your needs on various surfaces like siding, trim, or flat walls, while your doorbell always remains in the correct upright orientation.
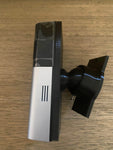
Standard Mount Specifications
- Base Plate Width: 1.8 inches
- Base Plate Height: 3.1 inches
- Base Plate Screw Hole Spacing: 2-5/8 inches (center-to-center)
- Projection from Wall (@ 0° Angle): Approximately 1.5 inches (maintaining a low profile)
- (Note: These are the standard base dimensions. See the Customization section for narrow or larger base options.)
Mounting Kit Highlights & Advantages:
- Variable Angle (0-35°): Offers subtle dual-axis swivel for accurate camera aiming.
- Tailored Fit System: Select your doorbell model for a perfectly matched, custom-made adapter bracket.
- Robust Locking Mechanism: Includes set screws to firmly secure the swivel at your desired angle.
- Concealed Wiring Option: A pass-through hole in the swivel joint allows for neat wire routing for hardwired doorbell installations.
- Versatile Surface Compatibility: Mounts effectively on flat surfaces or standard lapped siding (up to 1.8 inches wide).
- Compact, Low-Profile Form: Minimizes protrusion from the mounting surface.
- All-Inclusive Kit: Comes with the adjustable base, your selected custom doorbell adapter bracket, and all necessary mounting hardware.
- Weatherproof PETG Construction: Made from durable, UV-resistant PETG plastic, ideal for outdoor environments.
- Upgradeable System: Our cross-compatible base means if you switch doorbells later, you only need a new ~$10 adapter — not a whole new mount. Replacement brackets are available here.
Easy Setup Guide for Your Swivel Mount
-
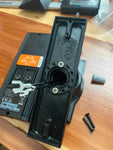
Gather Tools & Prepare: You'll need:
- Drill (with appropriate bits for your surface).
- Screwdrivers/Bits: PH2 Philips (for #6 base screws) AND PH1 Philips (for the typically #4 bracket/set/doorbell screws we provide). Using the correct bit size is key!
- Wall anchors (if mounting into drywall/masonry), Level (optional).
If hardwiring your doorbell, ALWAYS turn OFF power at the circuit breaker first! -
Mount the Base Plate: Route doorbell wires through the base. Position the base (screw holes can be vertical or horizontal) and attach securely using the #6 screws (PH2 driver) and appropriate wall anchors if needed.
Drill pilot holes if necessary. Do not overtighten the base screws, which could crack the base.
-
Attach Swivel Bracket to Base: Route wires through the top swivel bracket. Align it onto the base and attach using the four provided center screws (usually #4 / PH1 driver).
Use the correct PH1 bit. Start these smaller screws gently to avoid cross-threading. Do not overtighten.
- Set Approximate Angle: Adjust the swivel bracket to your desired angle (up/down & left/right) within the 0-35° range. Lightly tighten one or two of the set screws (usually #4 / PH1 driver) to temporarily hold the position.
- Connect Doorbell Wiring: If hardwiring, connect wires according to your doorbell manufacturer's instructions. Neatly tuck any excess wire into the mount cavity.
-
Attach Your Doorbell to the Custom Bracket:
- Align your specific doorbell model (or its original backplate, if that's how your model works with our adapter) with the pre-drilled holes on the custom swivel mount bracket made for your selected model.
- Secure the doorbell/plate using the specific small screws PROVIDED WITH THIS MOUNT KIT (usually #4 / PH1 driver).
- IMPORTANT: DO NOT USE the original long screws that came with your doorbell for this step, as they are likely too long and could damage the mount.
- Replace your doorbell's cover, if it has one.
Use the provided #4 screws and a PH1 driver. Tighten snugly, but do not overtighten, to avoid stripping. -
Finalize Angle & Secure: Make any fine adjustments to the angle. Once perfect, fully tighten all set screws (usually PH1 driver) gently but firmly.
Do not overtighten the set screws! Hand-tight is generally sufficient to lock the angle.Restore power (if applicable) and test your doorbell's view.
Always follow electrical safety rules and your doorbell manufacturer's guidelines. Use appropriate wall anchors for your mounting surface. Using the correct Philips bit size is crucial to prevent stripping screw heads.
Visual Guide & Product Examples


(Video demonstrates the general installation principles applicable to our range of swivel mounts.)
Got Questions or Need a Special Fit?
We're dedicated to helping you achieve the perfect doorbell setup! If you're uncertain about your doorbell model, require a custom mounting solution, or if your specific model isn't listed in the options, please don't hesitate to contact us:
- Email: shop@doorbellmount.com (Sending photos helps us help you faster!)
- Text/Call: 1-833-326-6868 (Feel free to text pictures!)
Default Color: This mount ships in Black. If you'd prefer White or another color, please add the separate Color Change Request listing to your cart along with this mount.
Angle Range Note: The maximum 35-degree angle is approximate and can vary slightly based on the specific doorbell model and installation nuances.
About 3D Printed Parts: While our 3D printing process produces high-quality, robust parts, minor cosmetic variations or layer lines may be visible. These are characteristic of the manufacturing method and do not compromise the mount's strength or functionality. Should you have any concerns about the quality, please reach out to us before leaving a review.
Order today — pick your doorbell model from the dropdown for a perfect, custom-fit installation!
Frequently Asked Questions
Will this mount fit my doorbell?
Yes — this mount fits 100+ video doorbell models including Ring, Nest, Eufy, Wyze, Arlo, Blink, and many more. Select your exact model from the dropdown to receive a custom-fit adapter bracket made specifically for your doorbell.
What angle does this mount provide?
0° to 35° on a dual-axis swivel — adjustable both horizontally (pan left/right) and vertically (tilt up/down) so you can fine-tune the camera's view.
How do I install this doorbell mount?
1) Turn off doorbell power at the breaker if hardwired. 2) Mount the base plate to the wall. 3) Attach the swivel bracket to the base. 4) Adjust to desired angle and tighten the set screws. 5) Attach your doorbell to the custom adapter using the supplied screws.
Do I need special tools?
A drill and Phillips screwdriver (PH1 and PH2 bits). All mounting hardware is included with the kit.
What if my doorbell model isn't listed?
Choose "Other (Not Listed)" from the dropdown and contact us at shop@doorbellmount.com or 1-833-326-6868 with photos of your doorbell. We'll create a custom adapter or recommend the closest fit.
Is this mount weatherproof?
Yes — 3D-printed in the USA from outdoor-rated PETG plastic that holds up to UV, rain, and temperature changes.