

Blink Doorbell Centered Brick Face Extension Mount (Flush Fit)
Compatibility: Blink Doorbell & Trim Width
- Fits ONLY: The standard **Blink Video Doorbell**.
- Confirm your model matches the picture below:
-

(Example Image - Click for Amazon Link. As an Amazon Associate, I earn from qualifying purchases.) - WILL NOT FIT: Any other Blink cameras or doorbells from other brands (Ring, Nest, etc.).
- CRITICAL TRIM WIDTH: This is a **CENTERED** mount. Your mounting surface (trim) **MUST be at least ~1.4 inches wide** (the width of the Blink doorbell itself) to fully support the doorbell without it overhanging the edges of the trim. For narrower trim, please choose an "Offset" mount.
Please double-check your Blink model and trim width before ordering! Send us a picture if unsure.
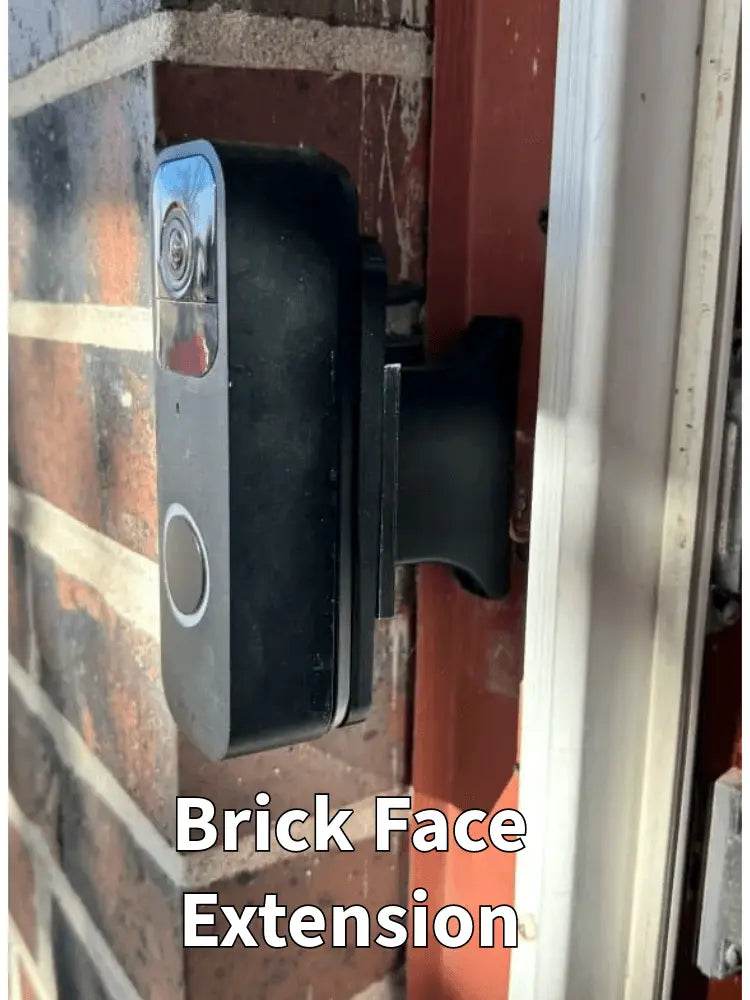
Position Your Blink Doorbell Flush with Brick! (Requires Wide Trim)
Want the cleanest possible look for your Blink Video Doorbell when mounted on trim recessed behind brick? This **Centered Brick Face Extension Mount** aims to position the **front face** of your doorbell approximately **flush with the surrounding brick surface**.
It extends straight forward (centered, no offset) by the length you select using the specific "Face Flush" measurement method. Remember, your trim must be wide enough (~1.4") to support the full width of the Blink doorbell for this centered mount. Avoids drilling into masonry!
How it Works: Centered Extension for "Face Flush"
This mount provides a STRAIGHT, CENTERED extension (no sideways offset). It's designed to bring the doorbell mounting point forward from recessed trim.
The goal with the recommended measurement (see guide below) is to have the **FRONT FACE of your Blink Doorbell** sit approximately **FLUSH** with the outer surface of your brickwork for the most integrated look possible.
If your trim is narrower than ~1.4 inches, please choose an "Offset Brick Extension" for Blink instead.
Base Dimensions & Mounting: This extension base is likely **3/4 inches wide** (confirm if different base width needed). Standard mounting hole spacing is typically **2 inches** (center-to-center) for fixed/centered mounts. Ensure solid mounting surface at least ~1.4 inches wide. Wall-mounting screws not included.
Angled Trim? If your wide trim is angled, standard Angle Shims may not fit the 3/4" base. Please contact us to discuss custom shim options.
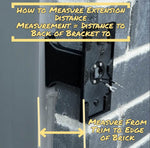
CRITICAL: Measure for Extension Length (Face Flush Goal)!
To achieve the Face Flush goal, select the extension length on this product page based on the following:
-
Preferred Method (More Accurate): Measure TRIM to BRICK FACE.
- Measure the exact distance straight out from the surface where the mount base will attach (your trim) to the outermost face of your brick.
- Order THIS measurement as your required Extension Length. (We internally account for the doorbell/bracket thickness based on this measurement to target a face-flush result).
- Example: If your bricks are 3 inches deep from the trim, select "3 inches" as the Extension Length.
-
Alternate Method (If you have doorbell):
- Hold doorbell face flush with brick.
- Measure from trim surface to **back mounting points** of doorbell.
- Order this length. (This method provides ultimate precision).
Select the required extension length from the dropdown menu when ordering.
Need help measuring? Text/email a picture! (Contact info below)

Measure from Trim to Brick Face (Method 1) or use Method 2 for best "Face Flush" result.
Key Features & Benefits:
- Tailored for Blink Video Doorbell: Ensures correct fit and adapter plate.
- Centered Design: Extends doorbell straight forward (no sideways offset).
- "Face Flush" Goal: Aims to align doorbell front face with the brick surface plane.
- Requires Wide Trim (>= ~1.4"): Ensure your mounting surface is wide enough for the doorbell itself.
- Selectable Extension Length: Order the precise depth using Trim-to-Brick measurement.
- Narrow Base (Likely 3/4" Wide): Fits standard trim widths (but requires overall width for doorbell).
- Standard 2" Base Hole Spacing: Often matches existing button holes (customizable).
- Wire Passthrough: Internal channel (less critical for battery-powered Blink, but available).
- Durable PETG Construction: Strong, weather-resistant plastic.
- Add-on Compatible: May work with specific fillers or custom shims.
- Future-Proof Bracket: Top adapter bracket potentially replaceable (check compatibility).
How to Install Your Centered Extension for Blink
This mount uses two main printed pieces: the Extension Base and the Doorbell Adapter Bracket.
-
Tools & Prep: Gather: Drill, PH1 & PH2 Philips Bits, Level, Anchors (if needed), your Blink doorbell backplate & hardware.
Ensure doorbell batteries are installed. Turn OFF power at breaker if attempting optional wiring.
-
Mount Extension Base: Position the Extension Base (correct length, centered) on your trim (ensure trim is >= ~1.4" wide) over any wires. Attach securely using appropriate screws (#6 size likely, use PH2) and anchors into the 2" spaced holes (verify spacing).
Ensure base is level. Do not overtighten.
-
Attach Doorbell Adapter Bracket: Route wires (if any) through the Doorbell Adapter Bracket (top piece for Blink). Align onto Extension Base. Attach using the four small center screws provided (likely #4 screws / PH1 driver).
Tighten screws snugly until bracket is flush. Clear debris if needed.
-
Attach Blink Backplate: Secure the **backplate that came WITH your Blink Doorbell** onto the Doorbell Adapter Bracket using the small screws PROVIDED WITH THIS MOUNT (typically #4 / PH1). Ensure correct orientation.
Do NOT use Blink's long wall screws here. Use correct PH1 driver.
- Mount Blink Doorbell: Connect wires (if applicable) to the Blink backplate following Blink's instructions. Click the Blink Doorbell unit firmly onto its backplate until secure.
- Final Check: Ensure doorbell is secure and test functionality.
Follow safety rules & Blink guidelines. Use appropriate anchors/screws. Ensure trim is wide enough to support doorbell width (~1.4").
Why Choose the Blink Doorbell Brick Extension?
Perfect Fit for Brick Surfaces
This Centered Brick Extension is specifically designed for installing your Blink Doorbell on trim near brickwork, aiming for a flush-face appearance. It provides a stable foundation when your trim is sufficiently wide (~1.4" or more).
Easy Installation Process
Installing this extension onto qualifying wide trim is straightforward. Follow the instructions to mount the base, attach the adapter, select your length (based on Trim-to-Brick measurement), and mount your Blink doorbell for a clean, integrated look.
Durable Construction for Outdoor Use
Made from high-quality, weather-resistant PETG, this extension ensures longevity and protects your Blink doorbell from the elements year-round.
Optional Add-ons & Customizations:
Enhance your installation:
-
 Customize Base Hole Spacing
Need different spacing than the standard 2" for the base? Add this service.
-
Need More Extension?
If the selectable lengths aren't enough, contact us for custom length options.
-
Custom Color
Standard Black. Add this service for White, Brown, Grey, etc.
Product Visualization
This Mount fits this Doorbell (Affiliate Link):
(See listing photos for details or contact us for more examples!)
Need Help? Confirm Compatibility & Measurements!
Confirm your trim is wide enough (~1.4") for this centered mount! Need help measuring for the "Face Flush" extension length?
- Email: shop@doorbellmount.com (Send Pictures!)
- Text/Call: 1-833-326-6868 (Text Pictures!)
Standard Color: Black. For other colors, add the Color Change Request item.
Doorbell Not Included. Includes the 2-piece extension mount (Extension Base + Doorbell Adapter Bracket) and necessary assembly screws.
Trim Width Requirement: This CENTERED mount requires your trim/mounting surface to be at least ~1.4 inches wide to fully support the Blink doorbell.
PETG Material: Printed in durable, outdoor-rated PETG.
3D Printed Quality: Minor cosmetic variations inherent to 3D printing may exist but do not affect function. Contact us with quality concerns.
Order the Centered Brick Face Extension for your Blink Doorbell today! Ensure your trim is wide enough, measure carefully using Trim-to-Brick distance for the Face Flush goal, and select your required extension length.