

Brick Face Extension for the Cove Doorbell Cam | Flush to the Brick
Bring Your Cove Doorbell Cam Out Flush With the Brick
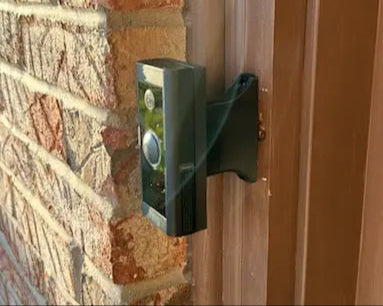
This is a centered brick face extension for the Cove Doorbell Cam — the slim battery-or-wired video doorbell that ships with Cove's security system. If your old doorbell sat in a recess behind a brick return, or the wiring comes out of mortar that is set back from the brick face, the Cove ends up buried in a pocket. Half the camera's view is brick and the button is awkward to reach.
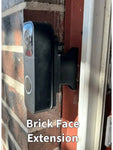
This extension builds the doorbell straight out to the brick face, centered over the original hole, so the Cove sits proud and level with a clean shadow line. You pick the exact distance in 1/8 inch steps from 1-1/2 inch all the way to 8 inch, so it ends up flush instead of close.
Specs and pricing for the doorbell itself are on the Cove Doorbell Camera page.
Measure Before You Order
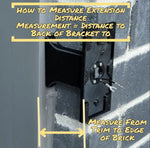
- You must select the Extension Distance. Measure from the surface your doorbell currently mounts to, straight out to the face of the brick. That measurement is the distance you order.
- Second image on this listing shows exactly where to put the tape.
- Most common is 2 inch — that suits standard 3 inch brick. If you are between sizes, go to the next size up; a hair proud looks better than recessed.
- Fits the Cove Doorbell Cam on battery or hardwired power, with the wire channel kept clear through the whole extension.
- Not sure? Send us a photo with a tape measure in frame and we will tell you the number.
Centered, Not Offset
This is the centered version. It extends straight out from the existing hole, so the doorbell ends up directly over where the old one was and you reuse the original wiring path.
If instead you need to move the doorbell sideways — off a brick return, away from the door frame, or clear of a storm door — the offset brick extension is the one you want. Centered goes out; offset goes out and over.
What You Are Choosing
- Extension Distance: 1-1/2 inch to 8 inch, in 1/8 inch steps through 6 inch and 1/4 inch steps above that
- Doorbell Model: Cove Doorbell Cam (2026)
- Base: 9/16 inch wide, centered over the original doorbell hole
- Wire Routing: open channel the full depth of the extension
- Material: PETG, 3D printed in the USA — UV and weather resistant
Longer extensions cost more because they take more material and print time — the price updates as you change the distance.
Key Features & Benefits
- Exact fit, not close enough — 1/8 inch increments instead of one generic size.
- Reuses your existing hole and wiring, so no new holes in brick.
- Full camera view — gets the Cove's 180° lens out of the recess so it is not staring at masonry.
- Hidden wire path straight through the middle.
- Weather-sealed footprint that bridges the mortar line.
- Cove-specific bracket matched to the doorbell's screw spacing and back profile.
Brick-Specific Notes for a Cove
- Cove says no tape on brick. Their own install guide advises against 3M adhesive on brick and stucco, and specifies a 15/64 inch (6 mm) bit with anchors instead. This extension is designed to be screwed, not stuck.
- Aim for the mortar joints. Mortar drills cleaner than brick face and patches easily if you ever move the doorbell.
- Getting the Cove out of a recess helps the radar too. The mmWave sensor works better with a clear line down the walkway instead of a brick wall two inches off its nose.
- Going into masonry? You will want a hammer drill and the right anchors — masonry bits and anchors on Amazon. As an Amazon Associate we earn from qualifying purchases.
Cove's own documentation: Pairing and Mounting · The Cove Spacer
Installing the Brick Face Extension on Your Cove
-
Measure first, order second. Tape from the current mounting surface out to the face of the brick. Round up to the next 1/8 inch and order that distance.
If your Cove is hardwired, switch the breaker OFF before you start.
- Remove the Cove with the removal pin from its box, then unscrew Cove's backplate. Keep both parts.
- Dry-fit the extension over the existing hole. Confirm it lands flush with the brick and sits plumb, then mark your fastener locations — aim for mortar joints wherever you can.
-
Drill your anchors. Masonry bit, hammer drill if you have one, and the anchors Cove specifies or equivalent. Blow the dust out of the holes.
Never force a screw into brick without an anchor — you will crack the face.
- Pull the wires through the extension's center channel, then fasten the extension to the wall.
- Attach the Cove bracket to the front face of the extension with the four #4 screws, PH1 driver.
- Wire it up (hardwired only) and tuck the slack into the channel behind the bracket.
- Snap the Cove on — grooves onto the bracket teeth, press until seated, lip over the top flap on the left.
- Power on and verify. Check the live view in the Cove app, press the button, and walk the approach to confirm motion triggers.
Follow Cove's wiring guidance and local electrical code. Eye protection when drilling masonry.
Cove Brick Face Extension FAQ
How do I know which Extension Distance to order?
Measure from the surface your doorbell mounts to now, straight out to the face of the brick. Order that number. The second photo on this listing shows where to hold the tape. If you are between sizes, round up.
What if I order the wrong size?
Message us. We would rather swap it than have you live with a doorbell that sticks out wrong.
Is this centered or offset?
Centered. It extends straight out over your existing hole. If you need to shift the doorbell sideways too, order the offset brick extension instead.
Will my wiring still reach?
Usually yes — the channel runs the full depth and most installs have slack in the wall. On a long extension, 6 inch and up, pull your slack forward before you fasten the bracket.
Do I have to drill into the brick faces?
No, and we recommend you do not. Fasten into mortar joints where possible. Mortar drills cleaner and patches invisibly if you ever relocate.
Can I use adhesive instead of screws?
Not on brick. Cove's own documentation advises against adhesive tape on brick and stucco, and a cantilevered extension puts real leverage on the mounting surface. Use anchors.
Is this made by Cove?
No. DoorbellMount.com designs and 3D prints it in the USA. It is an aftermarket accessory and is not affiliated with or endorsed by Cove Smart, LLC.
Send a Photo With a Tape Measure
Brick measurements are the thing people get wrong most often. Text us a picture and we will give you the exact distance to order — or build a custom size if nothing on the list fits.
- Email: shop@doorbellmount.com
- Text/Call: 1-833-326-6868
- Every mount we make: DoorbellMount.com
Standard Color: Black. Contact us before ordering for other colors.
Made to Order: Each extension is printed to the distance you select, so double-check your measurement before completing checkout.
3D Printed Quality: Strong and weather resistant, with occasional minor layer lines. Contact us before leaving a review and we will make it right.
Trademark Note: Cove and Cove Doorbell Cam are trademarks of Cove Smart, LLC.
Stop letting the brick swallow your doorbell. Measure, pick your distance, and bring the Cove out flush.