

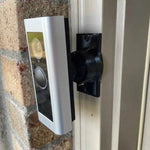


0-35° Adjustable Swivel Mount — Original Wyze Video Doorbell (v1)
A custom-fit 0-35° swivel mount for the original Wyze Video Doorbell (v1) — Wyze's first wired doorbell, with 1080p HD, a 3:4 portrait aspect ratio, and a head-to-toe field of view. The bracket is shaped to the v1's distinctive vertical body so it sits flush, and the dual-axis ball joint lets you tilt and pan up to 35° in any direction. Heavy-walled UV-stable PETG, set-screw locked, ships matte black. Made-to-order in the USA.
Custom-Fit for the Original Wyze Video Doorbell (v1)
This bracket is shaped specifically for the Wyze Video Doorbell (v1, original wired) — Amazon ASIN B08WQ15B37 (with horizontal wedge included). Wyze's first-generation wired doorbell with 1080p HD, 3:4 portrait aspect, head-to-toe view, weather-resistant IP65 build, and powered by existing 16-24V doorbell wiring. Released 2020, still widely used.
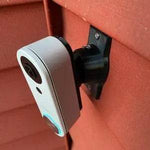
Does NOT fit: the newer Wyze Video Doorbell v2 (2K, slightly different shape — has its own dedicated mount), the Wyze Video Doorbell Pro (battery, 1:1 aspect), the Wyze Duo Cam Doorbell, or any non-Wyze brand. Each has a different body and needs its own bracket.
Confused which Wyze you have? The v1 has a 3:4 portrait shape (taller than wide) and is wired-only. If yours runs on a battery or has a 1:1 square lens, it's probably the Pro or Duo Cam — different mount.
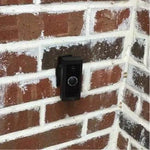
Why a Real Swivel Mount Beats Wyze's Stock Wedge
The v1 ships with a horizontal-only wedge — fine if your wall is square to the door, but a lot of homes aren't. Side-step entries, angled siding, recessed doorways: the stock wedge can't compensate for any of those, and you end up with the lens watching the wrong wall.
This 0-35° dual-axis swivel tilts AND pans up to 35° in either direction, then locks the angle permanently with set screws. The 1080p sensor on the v1 isn't huge — every degree of correct framing matters. Aim it right and you can actually read who's at the door.
Two-Axis Aiming, 0-35° Range
One smooth ball joint. Aim left, right, up, or down — all the way to 35° in any direction. Lock the angle with set screws. Done.

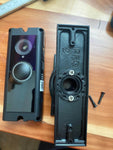
Internal Wire Routing — Hidden & Protected
Low-voltage wires enter from the wall, pass through the hidden internal channel inside the ball-joint mount, route through the front adapter, and connect directly to the doorbell terminals. No exposed wiring, no weather risk.

Mount Dimensions
- Base Width: 1.8 inches
- Base Height: 3.1 inches
- Hole Spacing: 2-5/8 inches center-to-center
- Wall Extension at 0°: ~1.5 inches (low-profile)
- Narrow 3/4" baseplate option available for thin trim — see Customization below.
What You Get
- Custom Bracket for Wyze v1: Pre-shaped pocket fits the 3:4 portrait body — flush, no rattle.
- Dual-Axis 0-35° Swivel: Tilt up/down, pan left/right; locks with set screws.
- Wire Pass-Through: Routes the existing 16-24V chime wires cleanly through the joint.
- Outdoor-Rated PETG: Matches the doorbell's IP65 rating — UV-stable, freeze-tolerant.
- Siding Compatible: Flat surfaces and lapped siding up to 1.8" wide.
- Future-Proof Base: Universal swivel — upgrade to a different doorbell brand later by ordering a ~$10 replacement adapter.
- Complete Kit: Adjustable base, custom v1 bracket, all required mounting screws.
Installing on the Wyze Video Doorbell v1
-
Power Off: Cut power to the doorbell circuit at the breaker. The v1 is wired only — no batteries.
Confirm the wires are dead with a multimeter. The Wyze v1 needs at least 16V AC at the doorbell location for the chime relay to work.
- Mount the Base: Pull the doorbell wires through, position the base vertically (or horizontally if you prefer landscape orientation), then screw into the wall with #6 screws (PH2 driver). Anchors if not into a stud.
- Attach the Swivel: Route wires through the swivel center, screw onto the base with four #4 / PH1 center screws.
- Wire the Doorbell: Connect the two transformer leads to the screw terminals on the back of the v1. Polarity doesn't matter for AC.
- Snap In the Doorbell: Use the screws PROVIDED WITH THIS MOUNT (PH1 driver) — not Wyze's wedge or stock screws.
- Aim & Lock: Restore power, open the Wyze app, switch to Live View, fine-tune the angle so the 3:4 frame covers your porch top-to-bottom, then tighten the set screws.
Chime note: the Wyze v1 needs a working mechanical chime in the loop to complete the circuit. If you removed your old chime entirely, install a Wyze Chime Pro or chime resistor — otherwise the doorbell won't get steady power.
Questions About Fitment?
- Email: shop@doorbellmount.com
- Text/Call: 1-833-326-6868
Standard Color: Ships in Black. Other colors via Color Change Request.
Need to Buy Your Wyze Doorbell?
Quick affiliate links to the full Wyze video doorbell lineup:
- Wyze Video Doorbell v2 (2K Wired, 2023) — B0C896D28H
- Wyze Wireless Video Doorbell Pro (1440p Battery + Chime) — B0BQCW4W6C
- Wyze Wireless Duo Cam Doorbell (2K Dual Cam, Battery) — B0DCJB43TH
- Wyze Video Doorbell v1 (1080p Wired, 3:4 Aspect) — B08WQ15B37
- Browse all Wyze doorbells on Amazon →
Affiliate Disclosure: As an Amazon Associate, DoorbellMount.com earns from qualifying purchases at no extra cost to you. Pricing is controlled by Amazon and may change.
Angle Note: The 35° maximum is approximate; actual range varies slightly by surface and orientation.
3D-Printed Parts: Minor visible layer lines are normal and do not affect strength. Each mount is printed-to-order in our USA shop.
Get the angle right on your Wyze v1 — order today.