


0-35° Adjustable Swivel Mount — Blink Video Doorbell (1st Gen)
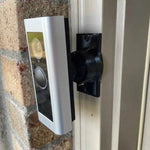
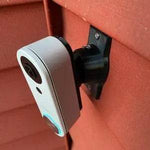
A custom 0-35° swivel mount built for the original Blink Video Doorbell (1st Gen, 2021) — the wide-screen 1080p model that runs on two AA lithium batteries for up to two years. The bracket cradles the 1st Gen's wider body so it sits flush against any wall, and the integrated dual-axis ball joint lets you fine-tune the camera up to 35° in any direction. Battery doors stay accessible — pop the back, swap batteries, no remount needed. Outdoor UV-stable PETG, set-screw locked, ships in matte black.
Custom-Fit for the Blink Video Doorbell (1st Gen)
This bracket is shaped specifically for the Blink Video Doorbell (1st Gen, 2021) — Amazon ASIN B08SG2MS3V. Blink's original budget doorbell with 1080p HD, 135° horizontal × 80° vertical FOV, 16:9 widescreen aspect, two AA lithium batteries (up to 2-year life with Sync Module), and the option to wire to existing chime power.
Does NOT fit: the new Blink Video Doorbell 2nd Gen (2025) — it has a chunkier, square 1:1 body with completely different mounting geometry. Use our Blink 2nd Gen mount for that model. Also does not fit Ring, Nest, Wyze, Eufy, or any other brand.
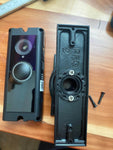
Confused which Blink you have? The 1st Gen is wider than tall (16:9 landscape sensor); the 2nd Gen is square. Snap a photo of the back if you're unsure.
The Stock Blink Wedge Is Fine — Until Your Wall Isn't Square
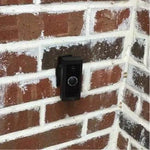
Blink ships the 1st Gen with a basic horizontal-only wedge. It works if your front door is dead-square to the visitor approach. If it's not — angled siding, recessed entry, side-step path — the wedge can't compensate. The camera ends up watching the wall opposite.
This 0-35° swivel mount tilts in two axes (horizontal AND vertical) so you can dial in the right view. Battery-only or wired, both install paths work. And because the 1st Gen runs on AA lithium for two years, you don't have to dismount it every six months to recharge — it just sits there.
Two-Axis Aiming, 0-35° Range
One smooth ball joint. Aim left, right, up, or down — all the way to 35° in any direction. Lock the angle with set screws. Done.

Internal Wire Routing — Hidden & Protected
Low-voltage wires enter from the wall, pass through the hidden internal channel inside the ball-joint mount, route through the front adapter, and connect directly to the doorbell terminals. No exposed wiring, no weather risk.

Mount Dimensions
- Base Width: 1.8 inches
- Base Height: 3.1 inches
- Hole Spacing: 2-5/8 inches center-to-center
- Wall Extension at 0°: ~1.5 inches (low-profile)
- Narrow 3/4" baseplate option available for thin trim — see Customization below.
What You Get
- Custom Bracket for Blink 1st Gen: Pre-shaped pocket — flush, no rattle.
- Dual-Axis 0-35° Swivel: Both horizontal and vertical aim — locks with set screws.
- Battery Door Accessible: Designed so you can swap the AA lithium batteries without unmounting the doorbell.
- Wire Pass-Through: If you're powering from existing chime wires (recommended for Sync Module Live View), the wires route cleanly through the joint.
- Outdoor-Rated PETG: UV-stable, freeze-tolerant, sealed against rain.
- Siding Compatible: Flat surfaces and lapped siding up to 1.8" wide.
- Universal Base: Future-proof — switch doorbells later for a ~$10 adapter swap.
Installing on the Blink Video Doorbell (1st Gen)
-
Battery vs. Wired Decision: The 1st Gen runs on 2 AA lithium batteries (included) or can be wired to existing chime power. If wiring, turn the breaker off first.
Use lithium AAs — alkalines die in cold weather and don't deliver enough current for the doorbell radio. AA NiMH rechargeables also work but won't last 2 years.
- Mount the Base: Pull wires through (if hardwiring), position the base vertically or horizontally to suit your trim/siding, screw in with #6 screws / PH2 driver. Anchors if not into a stud.
- Attach the Swivel: Route wires through the swivel center (skip if battery-only), screw onto base with four #4 / PH1 center screws.
- Insert Batteries (or wire the doorbell): Open the back door of the Blink, install fresh AA lithium batteries, close the back. If wiring, connect the two transformer leads to the doorbell's screw terminals.
- Snap the Blink In: Use the screws PROVIDED WITH THIS MOUNT (PH1 driver) — not Blink's wedge or anti-theft screws.
- Aim & Lock: Open the Blink app, trigger Live View (works only on motion/press without Sync Module), adjust the swivel until the 16:9 frame covers your porch, then tighten set screws.
Sync Module note: a Sync Module Core (or Sync Module 2) gives you on-demand Live View any time. Without it, you only see the camera when motion or a doorbell press triggers a notification within 60 seconds.
Questions About Fitment?
- Email: shop@doorbellmount.com
- Text/Call: 1-833-326-6868
Standard Color: Ships in Black. Other colors via Color Change Request.
Need to Buy Your Blink Doorbell?
Quick affiliate links to current and previous Blink doorbell models:
- Blink Video Doorbell (2nd Gen, 2025) — B0DGQVF47B
- Blink Video Doorbell (1st Gen, 2021) — B08SG2MS3V
- Blink Sync Modules & Accessories on Amazon →
- Browse all Blink doorbells on Amazon →
Affiliate Disclosure: As an Amazon Associate, DoorbellMount.com earns from qualifying purchases at no extra cost to you. Pricing is controlled by Amazon and may change.
Angle Note: The 35° maximum is approximate; actual range varies slightly by surface and orientation.
3D-Printed Parts: Minor visible layer lines are normal and do not affect strength. Each mount is printed-to-order in our USA shop.
Get the right angle on your Blink 1st Gen — order today.