
Ring Doorbell Gen 2 (2020) Combo: Full Offset Brick Extension + 15-90° Swivel
Compatibility: Ring Doorbell (Gen 2 - 2020, Integrated Battery) ONLY!
- Fits ONLY: The Ring Video Doorbell (2nd Generation) released in 2020 (Integrated Battery, charges via orange button). Also fits original Gen 1 integrated battery model.
- WILL NOT FIT: Other Ring models (Removable Battery versions, Pro/Pro 2, Wired, Wired Plus).
- Surface Width: Mount base is 9/16" wide, requires mounting surface (trim) at least 9/16" wide.
Unsure about your model? Check our Ring Model Guide or contact us!
The Ultimate Side-Wall Solution: Full Offset PLUS 15-90° Swivel!
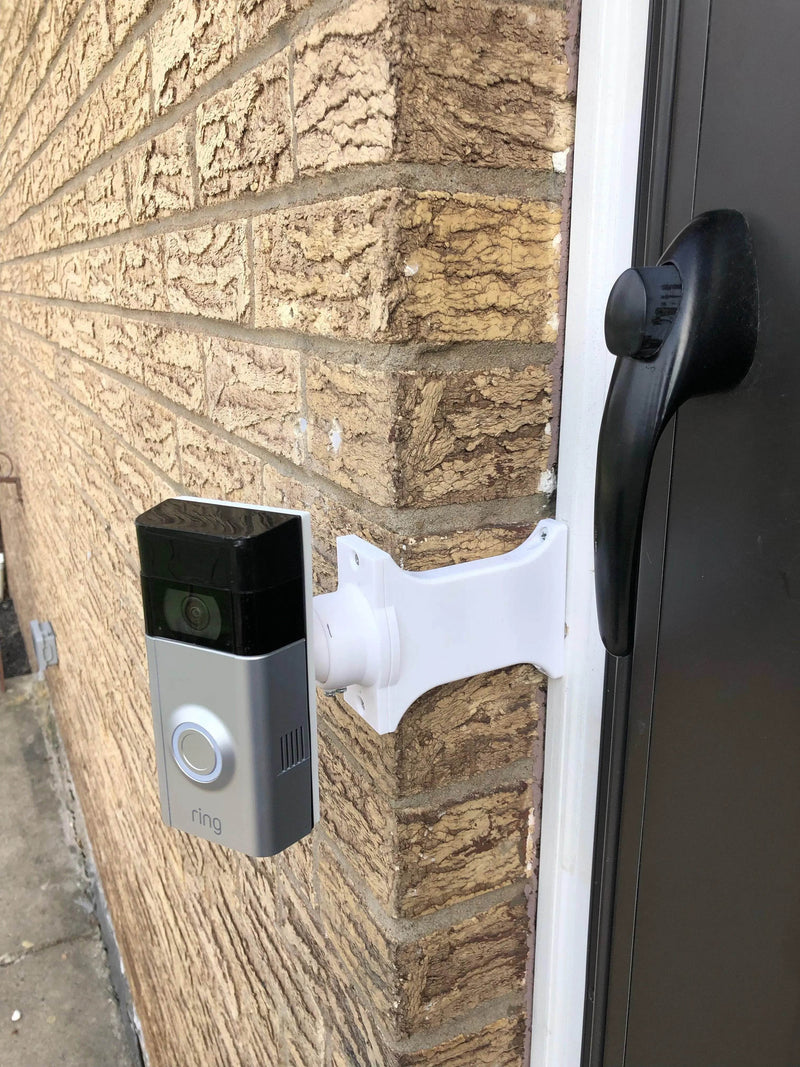
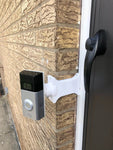
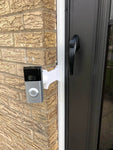
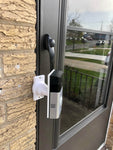
Mount your Ring Doorbell (Gen 2) on narrow trim recessed behind brick AND aim it sharply for perpendicular/side-wall installs? This All-in-One Combo Mount does both.
It combines our Full Offset Brick Extension (select your required length) with our wide-range 15-90° Dual-Axis Adjustable Swivel top — perfect for installations where your doorbell needs to face perpendicular to the door, around a corner, or down a walkway.
Full Offset Explained (Maximum Clearance)
The integrated extension base uses our FULL OFFSET design. This aligns the door-side edge of your Ring Gen 2 doorbell flush with the edge of the narrow 9/16" mount base, pushing the doorbell as far sideways as possible over the adjacent brick/siding for maximum clearance.
CRITICAL: Measure & Select Your Extension Length!
Choose the correct extension length to clear your brickwork. Measure carefully:
- Measure straight out from the surface where the mount base will attach (your trim) to the outermost face of your brick.
- Order THIS measurement as your required Extension Length. Do NOT subtract doorbell thickness for offset mounts.
Select the required extension length from the dropdown menu when ordering. (Starts at 1/4 inch).
15-90° Dual-Axis Swivel — Built for Side Walls
The integrated swivel top provides wide-range control for perpendicular installs. Adjust 15 to 90 degrees both horizontally (left/right) AND vertically (up/down) — perfect when the doorbell needs to look around a corner or down a side walkway.
Swivel Top Dimensions (Approx.)
- Swivel Base Width: ~1.8 inches
- Swivel Base Height: ~3.1 inches
- Wall Extension at 90°: ~3.5 inches (extends doorbell perpendicular to wall, beyond the selected brick extension length).
Key Features & Benefits
- All-in-One Solution: Combines Full Offset Brick Extension + 15-90° Swivel Angle Adjustment.
- Max Door Clearance: Full Offset design shifts doorbell furthest sideways over brick.
- Side-Wall Aiming: 15-90° Dual-Axis Swivel — for perpendicular walls, corner views.
- Perfect Fit: For Ring Video Doorbell Gen 2 (2020, Integrated Battery) & Gen 1.
- Avoid Drilling Brick: Mounts to existing trim (≥ 9/16" wide, Std. 2.5" hole spacing).
- Selectable Extension Length: Order the exact depth needed.
- Secure Angle Lock: Set screws hold the swivel angle firmly.
- Wire Passthrough: Channels throughout for wiring.
- Durable PETG Construction: Strong, weather-resistant plastic.
- Hardware Included: All necessary screws for assembly provided.
How to Install Your Combo Extension + 15-90° Swivel Mount
-
Tools & Prep: Drill, PH1 + PH2 Philips bits, level, anchors if needed.
Turn OFF power at the breaker if hardwiring.
- Mount Extension Base: Position on trim over wires. Attach with #6 screws (PH2) into 2.5" spaced holes.
- Attach Swivel Base to Extension Base: Align Swivel Mount Base over Extension Base. Secure with provided #6 screws (PH2).
- Attach Swivel Bracket to Swivel Base: Route wires through swivel. Attach with four #4 / PH1 center screws.
- Set Initial Angle: Adjust within 15-90° toward the visitor approach. Lightly tighten set screws.
- Wire Doorbell: Connect wires per Ring's instructions.
- Attach Ring Doorbell: First screw the plastic mounting bracket from your Ring onto the Swivel Mount's top bracket using the screws PROVIDED WITH THIS MOUNT (PH1). Then clip your Ring Doorbell onto its own bracket and secure with Ring's security screws.
- Finalize Angle & Secure: Make final adjustments. Fully tighten all set screws gently. Restore power and test.
Questions?
- Email: shop@doorbellmount.com
- Text/Call: 1-833-326-6868
Standard Color: Black. For other colors, add Color Change Request.
Doorbell Not Included.
PETG Material: Durable, outdoor-rated.
Angle Disclaimer: 15-90° range is approximate.
Order the ultimate side-wall combo! Get the Full Offset Brick Extension WITH 15-90° Swivel for your Ring Doorbell Gen 2 today. Remember to measure trim-to-brick face and select length!