

0-35° Adjustable Mount for the Lorex 4K Wired Video Doorbell (B862AJD-E)
Built for the Lorex 4K Wired Video Doorbell — Lorex's flagship doorbell with full 4K UHD resolution (3840×2160), 9:16 portrait head-to-toe aspect, 150° diagonal field of view, programmable LED security nightlight, color night vision, two-way audio with noise cancellation, IP65 weatherproofing, and microSD storage up to 256GB (32GB pre-installed). The bracket cradles the Lorex 4K body specifically (different from the 2K wired/battery models) and the 0-35° dual-axis ball joint aims the wide frame in any direction. Outdoor PETG, made-to-order in the USA.
Custom-Fit for the Lorex 4K Wired Doorbell
This bracket is shaped specifically for the Lorex 4K Wired Video Doorbell — Amazon ASIN B0CPQ3HXLT, model numbers B862AJD-E (white) and B862AJDB-E (black). Lorex's 4K UHD wired doorbell with 3840×2160 resolution, 9:16 portrait head-to-toe aspect (sees full visitor head-to-feet AND packages on the porch in a single frame), 150° diagonal field of view, integrated programmable LED nightlight, remote-triggered siren, color night vision, two-way audio, IP65 weather rating, microSD up to 256GB (32GB pre-installed), no subscription required, and integration with Lorex Fusion NVR systems. Wired-only operation: requires existing 16-24V AC doorbell wiring with a 30VA-min transformer.
Does NOT fit: the Lorex 2K Wired (B08PPSRKML — 4:3 aspect, different body) or the Lorex 2K Battery (B09VTM87LW — battery body). Each Lorex doorbell body has its own dedicated mount listing. Also does not fit Ring, Nest, Wyze, Eufy, Aqara, Tapo, Arlo, ecobee, Reolink, or any non-Lorex brand.
Confused which Lorex you have? The 4K model has a portrait/9:16 vertical lens orientation (the lens housing is taller than wide), advertises 4K / UHD on the box, and includes 32GB microSD pre-installed. The 2K Wired is 4:3 with a wider lens housing. The 4K body is also slightly chunkier overall than the 2K Wired body.
4K UHD Head-to-Toe — Aim It Right
4K resolution at 9:16 portrait orientation is the killer combo: most doorbell budgets either give you 4K in a wide horizontal aspect (you cut off the package zone) or 1080p in head-to-toe (you can't read the FedEx label). The Lorex 4K does both — 8MP of detail in a vertical frame that catches the visitor's face AND the package on the welcome mat in one shot. Plus the integrated LED nightlight is a real conversion-adjacent feature; visitors actually see the porch lit up.
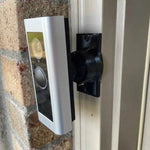
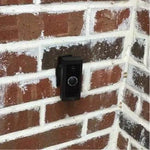
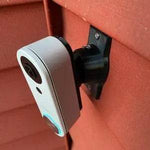
That whole-porch-in-one-frame advantage only works if the camera is aimed correctly. This 0-35° dual-axis swivel mount rotates the Lorex 4K in any direction up to 35°, locks permanently with set screws, and routes the 16-24V wires cleanly through the joint — no exposed wiring under the chunky 4K body.
Two-Axis Aiming, 0-35° Range
One smooth ball joint. Aim left, right, up, or down — all the way to 35° in any direction. Lock the angle with set screws. Done.

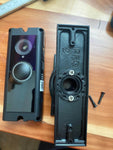
Internal Wire Routing — Hidden & Protected
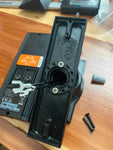
Low-voltage wires enter from the wall, pass through the hidden internal channel inside the ball-joint mount, route through the front adapter, and connect directly to the doorbell terminals. No exposed wiring, no weather risk.

Mount Dimensions
- Base Width: 1.8 inches
- Base Height: 3.1 inches
- Hole Spacing: 2-5/8 inches center-to-center
- Wall Extension at 0°: ~1.5 inches (low-profile)
- Narrow 3/4" baseplate option available for thin trim — see Customization below.
What You Get
- Custom Bracket for Lorex 4K Wired: Pre-shaped pocket fits the chunky 4K body — flush, no rattle, no obstruction of the lens, mic, integrated nightlight LED, or speaker.
- Dual-Axis 0-35° Swivel: Aim the 9:16 portrait 4K head-to-toe frame precisely; lock with set screws.
- Wire Pass-Through: Routes 16-24V AC doorbell wires through the joint cleanly.
- microSD Slot Stays Accessible: Designed so you can pull/swap the microSD card from the rear without unmounting.
- Outdoor-Rated PETG: UV-stable, freeze-tolerant — matches the Lorex 4K's IP65 rating.
- Siding Compatible: Flat surfaces and lapped siding up to 1.8" wide.
- Universal Base: Future-proof — switch doorbells later for a ~$10 adapter swap.
- NVR-Friendly: Works with Lorex Fusion NVR (8-channel, 16-channel) for 24/7 local recording.
Installing on the Lorex 4K Wired Doorbell
- Verify Wiring + Transformer: Confirm 16-24V AC at the doorbell location with a 30VA-min transformer (the integrated nightlight + 4K processing needs the headroom — a 10VA transformer will brown-out). 4K video also wants strong 2.4GHz Wi-Fi or wired 5GHz dual-band.
-
Power Down: Turn the breaker off at the chime circuit. Verify with a tester at the existing wires before pulling them through the mount.
- Insert microSD Card: The 32GB pre-installed card is fine for casual recording, but for 4K continuous recording you'll fill 32GB in ~1 day. Drop in a 256GB U3 card for ~7 days of 4K continuous video. Format from the Lorex Home app first.
- Pair Indoors First: Open the Lorex Home app, add the doorbell, scan the QR code on the back. Confirm 4K resolution mode is selected (the app sometimes defaults to 2K for bandwidth).
- Mount the Base: Pull the doorbell wires through the hole in the swivel base, position vertical (the Lorex 4K body is taller than wide — vertical orientation gives you the proper 9:16 head-to-toe frame), secure with #6 screws (PH2 driver). Anchors as needed.
- Attach the Swivel: Route the wires through the swivel center, attach to the base with four #4 / PH1 center screws.
- Connect & Mount the Lorex 4K: Connect the two doorbell-circuit wires to the Lorex's screw terminals. Snap onto the bracket using the screws PROVIDED WITH THIS MOUNT (PH1 driver) — not Lorex's stock plate.
- Aim & Lock: Restore power. Live View in the Lorex Home app → adjust the swivel until the 9:16 portrait frame covers your full porch (visitor face top, package zone bottom) → tighten the set screws.
- Configure Smart Lighting + Detection Zones: In the Lorex Home app: schedule the integrated nightlight (dusk-to-dawn or motion-triggered), set person/vehicle/package detection zones, and connect to your Lorex Fusion NVR if you have one for 24/7 local recording.
Bandwidth tip: 4K wired doorbells generate a lot of upstream Wi-Fi traffic. If your router is more than 30 feet from the doorbell, expect choppy live view. Either move the router closer, add a mesh node within range, or run the Lorex on a Lorex Fusion NVR (which records locally and bypasses cloud bandwidth issues).
Questions About Fitment?
- Email: shop@doorbellmount.com
- Text/Call: 1-833-326-6868
Standard Color: Ships in Black or White. Other colors via Color Change Request.
Need to Buy Your Lorex Doorbell?
Quick affiliate links to Lorex doorbells on Amazon:
- Lorex 4K Wired Video Doorbell (B862AJD-E) — UHD, 9:16 Head-to-Toe, Smart Lighting — B0CPQ3HXLT
- Lorex 2K Wired Doorbell — 4:3, Smart Lighting — B08PPSRKML
- Lorex 2K Battery Wireless Doorbell — 6200mAh — B09VTM87LW
- Lorex Fusion NVR — 24/7 local recording for Lorex doorbells
- Browse all Lorex doorbells on Amazon →
Affiliate Disclosure: As an Amazon Associate, DoorbellMount.com earns from qualifying purchases at no extra cost to you. Pricing is controlled by Amazon and may change.
Angle Note: The 35° maximum is approximate; actual range varies slightly by surface and orientation.
3D-Printed Parts: Minor visible layer lines are normal and do not affect strength. Each mount is printed-to-order in our USA shop.
Aim your Lorex 4K doorbell at the right spot — order the dedicated mount today.